Introduction
Contigo Burrito is a project that aims to achieve real-time tracking of the UNMMS internal transport bus (or buses!) to make students' lives easier, as well as:
- In-app notifications in the form of banners, popups and posts.
- Real-time tracking of the bus location, status and device battery.
- App versioning and forcing client updates.
- Bus stops and route information, including the distance to the next stop.
- User sessions (for analytics) and authentication (for protected resources).
- Feature flags for both server and clients.
- Multimedia upload integration with Cloudinary.
The following document contains all the technical high-level documentation of the project, including development setup, compilation, distribution, deployment, and other relevant information.
Support and Contact
Feel free to reach out to the team if you have any questions or need help with the project:
-
Paolo Flores @paoloose, pflores.fisi22@gmail.com
-
Luis Calle @luedu1103
-
Sebastian Rojas @SebastianRojas6
Overview
Here is a brief overview of the Contigo Burrito project and how its components interact with each other. For more detailed information, refer to the specific documentation of each component.
Components
The project is divided into four main components, each with its own repository:s
| Repository | Description | Technologies |
|---|---|---|
| burrito-app | The app that students use to check the bus status. | Flutter, Riverpod, Google Maps |
| burrito-server | REST API server responsible | Rust, Rocket |
| burrito-driver | Bus driver app that sends the location data. | Flutter, Geolocator |
| burrito-dashboard | Admin dashboard to interact with the system. | Vite, React |
Note that these are private repositores, so you may need to request access to them.
Architecture
The project follows a client-server architecture, where the server and driver are responsible for managing the data and the clients are responsible for displaying it.
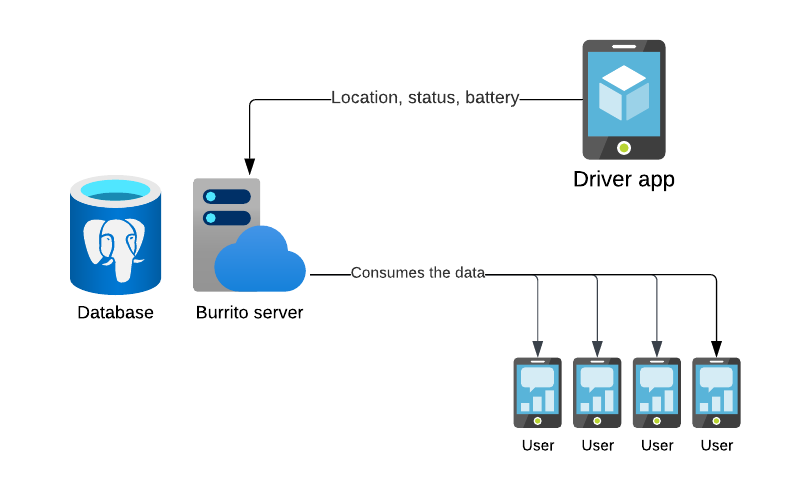
Burrito App
Status: production ready
The app that students use to check the bus status. It consumes the status
records from the burrito-server by constantly polling for the /status
endpoint.
It is written in Flutter and builds for Android and web platforms.
Refer to the docs/ for more information.
App updating protocol
The GET /pending_updates?version=1.0.0 endpoint will return a list of application versions that
are newer than the one provided in the query parameter.
// Example
{
  "must_update": true,
  "versions": [
    {
      "banner_url": "https://picsum.photos/id/866/400",
      "is_mandatory": false,
      "release_date": "2019-10-12T07:20:50.52Z",
      "release_notes": "This is a LONG summary of the changes that are introduced in the new version that can even include breaklines.\n\n- Feature 1\n- Feature 2",
      "semver": "1.1.0"
    }
  ]
}
The client MUST NOT let the user proceed with the application if some version is marked as
is_mandatory. If the client decides to, it can show a dialog to the user with the changelog and
the option to update, storing the acknowledgement in the local storage.
An example of the workflow would be:
Act 1: the first time

>client fetches /pending_updates?version=1.0.0
>server returns two pending version, where neither is mandatory
>two options, [Update now] and [Later] are shown to the user along with the changelogs
>user acknowledges
>client stores the highest one as "latest_acknowledged_version" in local storage
>user decides not to update

Act 2: next day, next update

>client fetches /pending_updates?version=1.0.0
>now server returns three versions, still none mandatory
>since one of them is newer than "latest_acknowledged_version", client shows the dialog
>user acknowledges
>client stores the highest one as "latest_acknowledged_version" in local storage
>user decides not to update

Act 3: the urgent update

>the client fetches /pending_updates?version=1.0.0
>now server returns four versions, where the last one (2.0.0) is mandatory
>client merges the changelogs and shows them to the user along with the [Update now] button
>user acknowledges and it only option is to update
>client stores the highest one as "latest_acknowledged_version" in local storage
>user updates

Act 4: the calm after the storm

>client fetches /pending_updates?version=2.0.0
>server returns an empty list
>client proceeds with the app
The above example describes our current implementation. We might change it in the future, but the general idea will remain the same.
Construyendo el cliente móvil
Para obtener información más detallada, consulte Los documentos oficiales de flutter.
Hay un flujo de trabajo funcional llamado ios-compilation.yml en el directorio .github/workflows que puedes consultar.
Construyendo el APK
Para crear APK para múltiples arquitecturas (p. ej., ARM, ARM64, x86), utilice el siguiente comando. Esto generará archivos APK separados para cada ABI (interfaz binaria de aplicación), lo que permitirá a los usuarios descargar el APK apropiado para la arquitectura de su dispositivo:
flutter build apk --split-per-abi
Los APK se guardarán en build/app/outputs/flutter-apk/ directorio. En esa carpeta se encuentran los APK generados, listos para probar o distribuir.
Crea un paquete de aplicaciones para su lanzamiento
Además de crear archivos APK, también es una buena práctica generar un paquete de aplicaciones (.aab) para lanzar la aplicación en Google Play Store. El paquete de aplicaciones contiene todo lo necesario para la distribución y Google Play optimizará la aplicación para diferentes configuraciones de dispositivos de manera automática.
Para crear una versión de lanzamiento de la App Bundle, utilice el siguiente comando:
flutter build appbundle --release
Una vez que se complete la compilación, el archivo .aab estará disponible en build/app/outputs/bundle/release/ Puedes cargar este archivo en Google Play Console o en cualquier otra tienda de aplicaciones que admita App Bundles.
Publishing Your App to the Google Play Store
There are some things you want to check before submitting the app to the Google Play Store (or any other store).
-
Make sure the server is running
Before submitting your app to an app store, it's important to verify that the server your app relies on is live, functional, and ready to handle requests. Many app stores require apps to provide real functionality and not just placeholders, so they might review the app's responses to verify it's working as expected.
If you don't have a driver sending the data yet, read the Using mocked routes section.
- Check for Expected Responses: Test that the API is correctly providing the location of the burrito.
- Monitor Uptime: Many app stores may periodically check your app's functionality during the review process. Consider using a monitoring service to alert you if your server goes down unexpectedly.
-
Make sure the app is using the correct API and not the local host
Check the
lib/services/dio_client.dartfile to ensure that the app is connected to the correct API endpoint. ThebaseUrlshould be set to your live API URL, not localhost:baseUrl: 'https://yourAPI.com',Now you are ready to publish the app in the store of your choice.
Deploying the app in the web using Cloudflare Pages
Cloudflare Pages deployment is already configured as a GitHub workflow that
is triggered on every push to the main branch.
For details see the .github/workflows/deploy.yml file.
Using a custom domain
By default, Cloudflare Pages are deployed to the *.pages.dev domain.
To use a custom domain, follow the instructions provided by Cloudflare
in the Pages dashboard.
Manually building the Web App
Build the app for web with:
flutter build web -t lib/main.dart
Burrito server
Status: Production ready
The Burrito API serves all the server data (app versions, notifications, flags, sessions) and is the communication bridge between the bus driver application and user application.
The server is written in Rust and uses the Rocket web framework.
API documentation
For the API documentation we followed a code-first approach. The documentation
is generated from the source code using utoipa,
which generates an OpenAPI 3.1 specification file at compile time.
This specification is then consumed and rendered by
Scalar. The final document result is served
by the API itself, and can be publicly accessed at /docs.
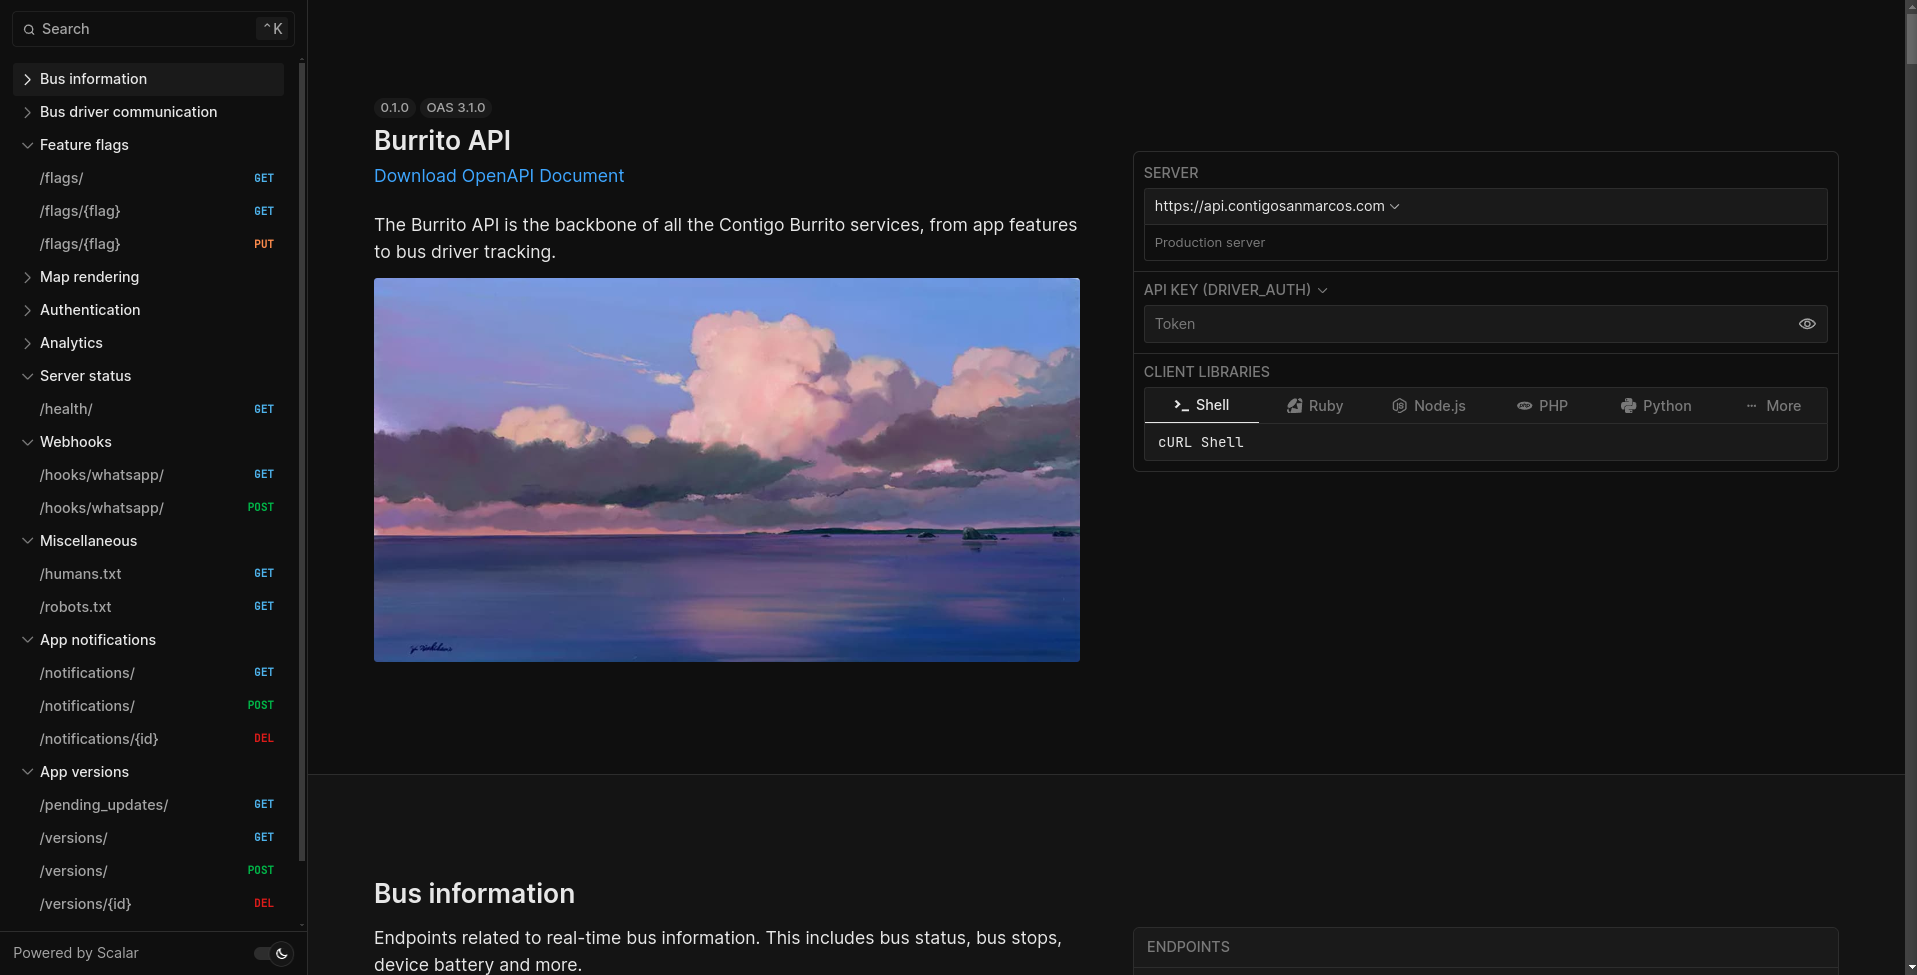
Live documentation is hosted in https://api.contigosanmarcos.com/docs.
Documenting API endpoints
To document a route you use the path attribute macro from utoipa. This
macro takes several arguments to document the endpoint. The most important
are shown in this PATCH /flag/id example:
#[utoipa::path(
    tag = docs::tags::APP_VERSIONS_TAG,
    description = "Edits an existing app version. All columns are optional.",
    request_body(content = schemas::AppVersionPatchPayload),
    responses(
        (status = 200, body = schemas::AppVersion),
        (status = 400),
        (status = 401),
    ),
    security(("staff_user_auth" = [])),
)]
#[patch("/<id>", format = "json", data = "<payload>")]
async fn patch_app_version(
    id: i32,
    _user: StaffUser,
    payload: JsonResult<'_, schemas::AppVersionPatchPayload>,
    state: &State<AppState>,
) -> ApiResponse<Json<schemas::AppVersion>> {
    // ...
}
Refer to the utoipa::path documentation for more details.
Database managment
Our database driver, sqlx, already solves the majority of the database management issues.
If you are not familiar with sqlx, this video is a good starting point:
First, make sure you have the sqlx client installed.
cargo install sqlx-cli
Creating database migrations
Database migrations live in the migrations/ directory. Create one for each
change you want to make to the database schema.
For example, let's say you want to add a new profile_image column to
the users table, you can create a new migration like this:
sqlx migrate add -rs add_users_profile_image
Two files will be created in the migrations/ directory:
migrations/000x_add_users_profile_image.up.sqlmigrations/000x_add_users_profile_image.down.sql
Edit the up.sql file to add the new column:
ALTER TABLE users
ADD COLUMN profile_image TEXT;
Edit the down.sql file to remove the column:
ALTER TABLE users
DROP COLUMN profile_image;
The idea is that the down.sql file should revert the changes made in the
up.sql, letting the database in exactly the same state as before the
migration.
Then you can run or revert the migrations with:
sqlx migrate run
sqlx migrate revert
Or completely reset the database with:
sqlx database reset --force
Once you commit your migrations, you do not need to do anything more to apply them to production, because they are always checked and executed on each server start.
Compiling the queries for offline mode
The idea of sqlx is that plain SQL queries are checked at compile time and translated into Rust primitives. However, this requires a connection to the database to check the queries.
This is why offline mode compilation exists. The only thing you need to make sure is to always run the following before committing your changes:
cargo sqlx prepare
The compiled queries will be saved in the .sqlx/ directory and should be
committed to the repository. For more details, check the
Offline mode docs.
Environment variables
The .env.example shows an up-to-date list of all environment variables that
the server uses. Start by copying the example file to .env:
cp .env.example .env
All the variables defined here directly map an static, global Rust variable
defined in the src/env.rs file, so you can use them in your code like this:
fn main() {
  let port: u16 = *crate::env::PORT;
  println!("Server running on port {}", port);
}
Examples
A ready-to-go .env file for development would look like this:
IS_MOCKED=false

ROOT_SECRET="root_secret"
AUTH_DRIVER_PASSPHRASE="driver_pass"
AUTH_WHATSAPP_ACCESS_TOKEN="none"

POSTGRES_PASSWORD="dontship"
DATABASE_URL="postgres://admin:${POSTGRES_PASSWORD}@localhost/burrito_app"

CLOUDINARY_API_KEY="438453545385499"
CLOUDINARY_CLOUD_NAME="sea1jk51z"
CLOUDINARY_API_SECRET="mJd3bbkWa5mPVKuNBgCLxjY5FSM"
A .env file for production would look like this:
IS_MOCKED=false

ROOT_SECRET="burrito_prod_6z3g5z2t5z2g5Z2t5g3X"
AUTH_DRIVER_PASSPHRASE="burrito_prod_K4ZVf3g1zS6x2TcjdyDztkbvh4CQHrF6"

# Leave it empty ("") if you don't plan to use the WhatsApp API
AUTH_WHATSAPP_ACCESS_TOKEN="EAAjnKUIiz4ABOzMXloXZCVvifdfFHJGHvlFFWENYE1zFyfg0Ikh0ExDWnkTO1q9CllVXQgKZBvrD3XUucr6Bxk9RIZAITIvzAxWZB2KbZApppIbSwsk2Ozu54emMqb6QlpBRrUM7WAvrRWa8ZApj5p4ZBY9ROIcHKI6CXujoAg1Q1jnv7pJCnVeLDUblAND97J7Q5LliGPZCdiZAHKI16boABdPHo6p2mm8lFCIYZD"

POSTGRES_PASSWORD="MM3ky4RhgpFSbfoXmUh42r0REZzCYXyu"
DATABASE_URL="postgres://admin:${POSTGRES_PASSWORD}@burrito_db/burrito_app"

CLOUDINARY_API_KEY="438453545385499"
CLOUDINARY_CLOUD_NAME="sea1jk51z"
CLOUDINARY_API_SECRET="mJd3bbkWa5mPVKuNBgCLxjY5FSM"
Uploading the production variables to GitHub
If you are using the GitHub CI pipeline, make sure to set the variables in the
GitHub repository settings. You can find them in the Settings tab, under
Secrets and Variables > Actions section.
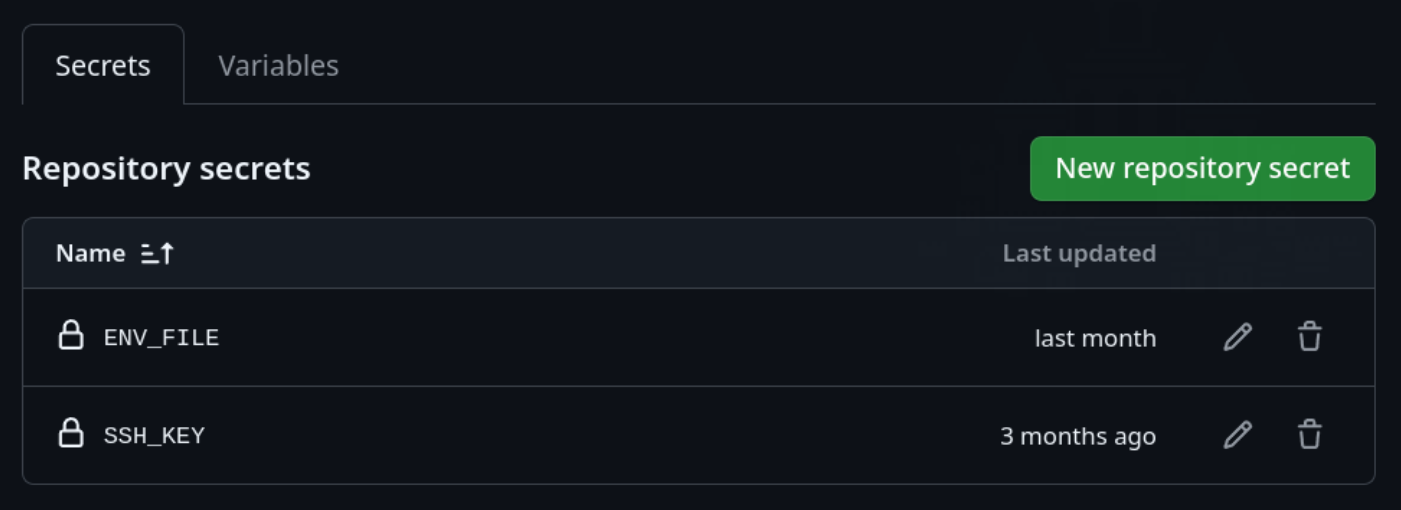
Secrets description:
ENV_FILE: An exact copy of the production .env file content.SSH_KEY: The private SSH key that will be used to connect to the server. This assumes the public key is already in the server'sauthorized_keysfile.
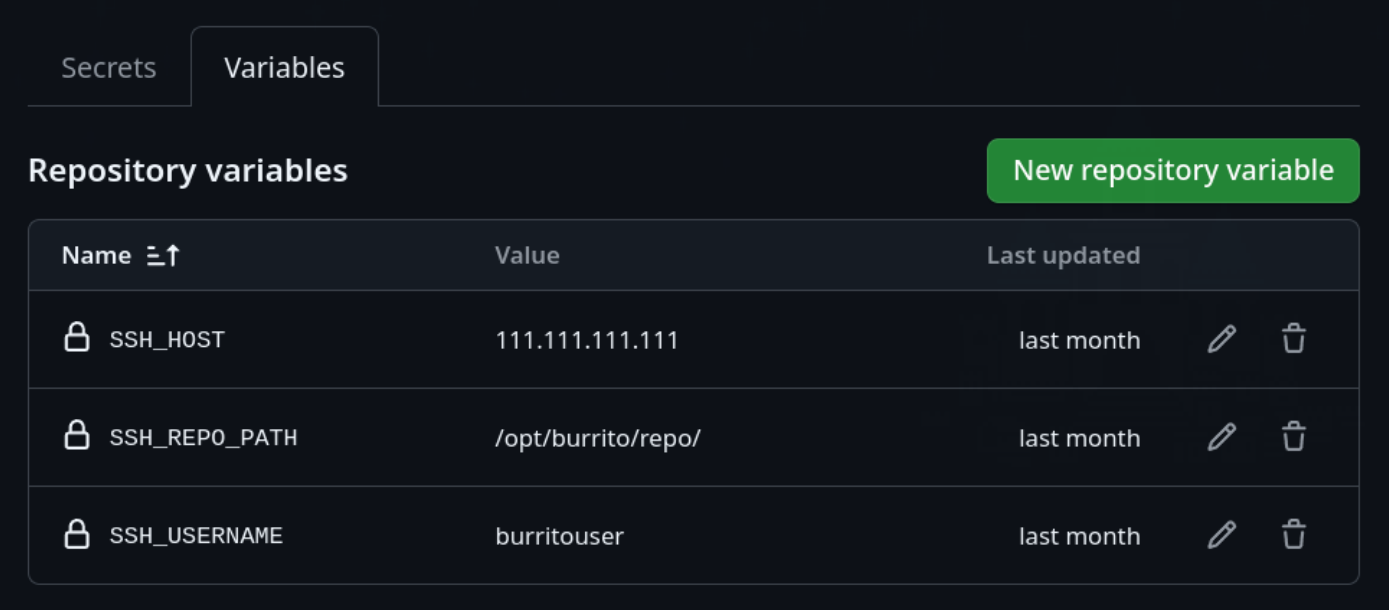
Variables description:
SSH_HOST: The host where the server is running.SSH_USERNAME: The user that will be used to connect to the server.SSH_REPO_PATH: The path where the repository is already cloned in the server.
Creating a new app user
Currently there is no way to create a new user from the API, you'll need direct database access to
the internal schema.
There is a DB procedure internal.create_user exactly for this purpose.
\df internal.create_user
Its (current) definition is as follows:
CREATE OR REPLACE PROCEDURE internal.create_user(
    p_username citext,
    p_display_name varchar(255),
    p_password text,
    p_is_active boolean,
    p_is_staff boolean
)
For example, in the local dev container you would do the following:
$ psql 'postgres://admin:dontship@localhost/burrito_app'

burrito_app=# CALL internal.create_user('username', 'Display Name', 'pass123', true, true);
Changing the user password
There is a DB procedure internal.change_password for changing a user's password.
\df internal.change_password
For example, to change the password of the user created in the previous step:
$ psql 'postgres://admin:dontship@localhost/burrito_app'

burrito_app=# CALL internal.change_password('username', 'newpass123');
Verifying the user
Similarly, there is a DB function internal.get_auth_user for querying a user by its username and password.
\df internal.get_auth_user
For example, to verify the user created in the previous step:
$ psql 'postgres://admin:dontship@localhost/burrito_app'

burrito_app=# SELECT * FROM internal.get_auth_user('username', 'pass123');
This functions is used under the hood on app routes that require authentication.
Why this even exists?
So Postgres is responsible of hashing the password and storing it securely. The server is not responsible for hashing or verifying anything.
Using a mocked bus route
No bus driver? No problem! You can start the app with a mocked route
by setting IS_MOCKED=true in the env file.
The mocked route will be read from static/mocks/*.json. See mock.rs for more
details.
Once you have set IS_MOCKED=true, you can start the server as usual.
Mocking works by sending POST /driver requests to ourselves,
iterating over the mocked route records.
Why would I use this?
This feature is useful for showcasing the app without having to rely on a real bus driver, or testing purposes and MUST NOT be used in production.
Server deployment
The server repository contains all the necessary components to easily set up continuous integration and continuous deployment with just a VPS and GitHub Actions.
Setting up the VPS
The initial VPS setup should be straightforward to follow. Assuming you are in a Debian bookworm server with root privileges:
Dependencies
- Install Docker and Docker Compose following the official guide https://docs.docker.com/engine/install/debian/.
SSH authentication
-
Create a new user that you would use to deploy the server. Name it however you like
# adduser burrito # usermod -aG sudo burrito -
Generate a SSH key pair (or upload an existing one) for the new user
# su burrito $ ssh-keygen -t ed25519 -C "admin@burrito" -f ~/.ssh/id_ed25519 -
Copy the public key to the server's
authorized_keysfile$ cat ~/.ssh/id_ed25519.pub >> ~/.ssh/authorized_keys -
Test the connection to the server
$ ssh burrito@localhost
Repository setup
-
Now clone the server repository
$ sudo mkdir -p /opt/burrito/repo $ git clone git@github.com:burrito/server.git /opt/burrito/repo -
If you are using the GitHub CI pipeline, set the variables in the GitHub repository settings and you are ready to go. See Uploading the production variables to GitHub.
Otherwise, manually populate an
.envfile.
TLS certificates
-
Carefully read the
docker/prod/nginx/nginx.conf. It contains the server configuration and the paths to the TLS certificates. -
Follow the instructions of your CA (Let's Encrypt, for example) to generate the certificates. You'll probably need to create a new DNS record pointing to the server's IP address or a challenge TXT record.
-
Generate a pair of TLS certificates using Let's Encrypt or any other CA. For example, using Certbot:
# certbot certonly --standalone -d api.contigosanmarcos.com -
Wherever domain you have used, make sure to update the
DOMAIN_NAMEvariable in thedocker-compose.prod.ymlfile. -
If you want to save the certs in a custom path (such as /opt/burrito/certs) make sure to update the
docker/prod/nginx/nginx.conffile. -
Use a DNS propagation checker to check if your domain is correctly pointing to the server's IP address.
Starting the container
-
Start the server using Docker Compose
$ cd /opt/burrito/repo $ docker compose -f docker-compose.prod.yml up --build -
Every time you want to update the server, just pull the changes and restart the server
$ cd /opt/burrito/repo
$ git pull origin main
$ docker compose -f docker-compose.prod.yml up --build
Altough, it is strongly recommended to use GitHub Actions pipeline instead.
Production checks
Before deploying to production, make sure you have the following checks in place:
-
You have properly set up the required environment variables.
-
You have compiled the queries for offline mode by running
cargo sqlx prepare -
The database migrations are up-to-date and have been tested locally
-
You have make sure the server compiles and runs without any errors
Bus Driver Application
Status: Production ready
A Flutter application that send the location, battery and status of the UNMSM bus transport in regular intervals to be consumed by application clients.
Construcción de la aplicación del conductor de bus
Para información más detallada, consulta la documentación oficial de Flutter.
Hay un flujo de trabajo funcional llamado ios-compilation.yml en el directorio .github/workflows que puedes consultar.
Construcción del APK
Para construir APKs para múltiples arquitecturas (por ejemplo, ARM, ARM64, x86), utiliza el siguiente comando. Esto generará archivos APK separados para cada ABI (Interfaz Binaria de Aplicación), permitiendo a los usuarios descargar el APK adecuado para la arquitectura de su dispositivo:
flutter build apk --split-per-abi
Los APKs se guardarán en el directorio build/app/outputs/flutter-apk/. Puedes encontrar los APKs generados en esa carpeta, listos para pruebas o distribución.
Construir un paquete de la aplicación para la liberación
Además de construir los APKs, también es una buena práctica generar un Paquete de la Aplicación (.aab) para liberar la aplicación en la Google Play Store. El Paquete de la Aplicación contiene todo lo necesario para la distribución, y Google Play optimizará automáticamente la aplicación para diferentes configuraciones de dispositivos.
Para construir una versión de liberación del Paquete de la Aplicación, utiliza el siguiente comando:
flutter build appbundle --release
Una vez que la construcción esté completa, el archivo .aab estará disponible en el directorio build/app/outputs/bundle/release/. Puedes subir este archivo a la Google Play Console o cualquier otra tienda de aplicaciones que soporte Paquetes de Aplicación.
How the driver application works
Background location service
This app uses a background location service to continuously track the position of the bus, even when the app is in the background or when the screen is off. This service runs silently, ensuring that the bus-s location is sent to the server without requiring the user to have the app open.
Sending the location to the API
The app periodically sends the bus's GPS coordinates to a server. This is done through an API endpoint, which the app hits in the background.
Sending the battery of the phone
At the same time the app sends a coordinate to the server, it also sends the battery of the phone.
Simple button to start or end the service
The app includes a simple button that allows users to start or stop the background location service. When the service is started, the app will begin sending location updates to the server. When stopped, the app will no longer track or send location data, effectively ending the location tracking for the bus.
Change the state of the burrito
The app allows changing the state of the bus, referred to as the "burrito," between different operational statuses. These statuses represent the current condition of the bus:
- En ruta ("In route"): The bus is on its way to its destination.
- Fuera de servicio ("Out of service"): The bus is not operational or unavailable.
- En descanso ("At rest"): The bus is temporarily stopped or idle.
- Accidente ("Accident"): The bus has been involved in an accident.
- Error ("Error"): There is an issue with the bus or its location data.
- Cargando ("Loading"): The bus is being loaded or is in preparation.
- Desconocido ("Unknown"): The bus status is not known.
Burrito Admin Dashboard
Status: production ready, but partially finished
Dashboard for staff/admin users to manage protected resources.
Features
- Notifications: Add and delete app banners. No popup or posts are currently supported.
- Battery: Quick view of the remaining app battery.
Written with React and Vite.
Dashboard deployment
The dashboard is a simple React Vite application so it should be straightforward to deploy.
Cloudflare Pages
With the help of GitHub Actions, the deployment is mostly automated. Ensure you have the following in place:
-
Set up GitHub Secrets: Add your
CLOUDFLARE_API_TOKENandCLOUDFLARE_ACCOUNT_IDin your GitHub repository secrets. -
Verify the GitHub Actions Workflow: Ensure the workflow file is properly configured to build and deploy the application. The configuration is in
.github/workflows/cloudflare-deploy.yml
Deployed at https://burrito-dashboard.pages.dev/
Additional notes
Before deploying the dashboard, make sure to:
-
Ensure that a user account with the appropriate permissions is created in the database. This allows access control and ensures that each user can interact with the dashboard as expected.
-
Verify that the backend server is running and accessible. The dashboard relies on the server for data retrieval and updates, so a live connection is essential for full functionality.